Why Netflix’s Bad Decision is Bad for Indie Film
Sure, I was annoyed a few months ago just like everyone else when I heard about Netflix's 60% price hike. But when I first started using Netflix almost ten years ago, it was just to get DVDs in the mail. Several years later, I streamed the first "Watch Instantly" content on my laptop, which was an exciting new curiosity. Now I regularly stream movies and TV shows right to my TV through my internet-connected Blu-Ray player, and it's hard to imagine the future (and present) of home entertainment without having access to this feature. So, the prices have increased, but the functionality has increased as well. I was not super excited by the prospect of paying 60% more for the exact same service I've been getting, but I understand it. Netflix wants to increase its selection of streaming content (which, is undoubtedly the way of the future), and licensing more and better content will cost more. I understand that, and was willing to pay the new higher prices for a service (ONE srevice) I considered invaluable. But Netflix's new shocking announcement that it is dividing its streaming and DVD services into two separate companies ("Netflix" and "Qwikster", respectively) makes me have to reconsider whether either of these TWO services is actually worth paying for at all.
Locations, Locations, Locations
As a DP, I am always asked about ways to make to make a film look good with minimal resources. People are always wondering about this camera or that camera, the benefits of one format versus another, or creative ways to light without a lot of expensive gear. All of those things are important discussions to have of course, but nothing will affect your image more that what's actually in front of the camera. Locations are far too often neglected on a low-budget film and they will ultimately have the greatest impact on how that film looks in the end. In fact, I think the DP often gets credit for making a film look good, when the location itself is actually doing most of the work.
You can shoot on 35mm, and have all the crew and gear in the world, but the fact is, a room with four white walls is just never going to look that interesting. On the other hand, if you're shooting someplace that's already beautiful, you could shoot it on a cell phone and it will still look beautiful. Take this iconic image from Lawrence of Arabia, a film that is probably as known for its outstanding cinematography as any film in history:

Breathtaking. Now let's look at what this same scene would look like, had it been shot not in a vast desert, but in a more typical indie film location -- a filmmaker's apartment:
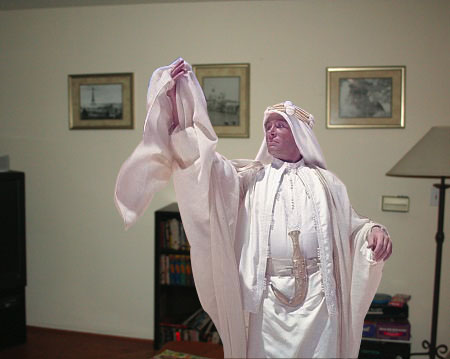
Somehow it just doesn't quite have the same impact. I don't mean to belittle the excellent work of the legendary cinematographer Freddie Young, but I definitely think having some nice scenery to work with probably made his job a little easier.
I understand that there are other practical considerations in play, and the uncle's house that you can get for free may be the only location you can realistically shoot in, but sometimes it may actually be worth it to pay for a location or two. After all, you're paying a DP and a film crew, renting equipment and paying for all kinds of expensive stuff to make your film look good. Don't skimp where it's really going to count and try to make your basement look like a working operating room. It can be hard to find great locations for free or cheap in New York or LA, but you might be surprised at what you could find for little to nothing if you're a couple hours out of town.
Congratulations to “Silver Tongues”
I just spent the last week in Park City, where a film I shot, "Silver Tongues", from writer/director Simon Arthur, was playing at the Slamdance Film Festival. I'm proud to say that last night the film won the festival's Audience Award for Best Narrative Feature. I was happy to be able to be at the film's premiere on Sunday, and experience it with an audience for the first time. Most of my job as a DP (and most of the writing on this blog, for that matter) is focused on the smallest details of cinematography and filmmaking. I can spend months working on a film, concentrating on the minutiae, but it's only once the film is finally finished that I get to take a step back and actually look at the finished product, to watch it, with an audience, no longer as a project but as a movie. It's the most rewarding part of the filmmaking process, and why most of us who do this for a living got started in the first place. I spent some time debating whether the trek to Park City was worth the time and expense, but in the end, I'm so glad I ended up deciding to go. The premiere screening was fantastic, the audience loved the film, and ultimately, if I couldn't enjoy that, I would have to seriously wonder why I chose this as a career.
Hopefully, you will be able to see "Silver Tongues" soon, but in the meantime, check out this trailer for a glimpse of what you have to look forward to.
Highlight Tone Priority in Canon’s DSLRs
I've noticed that several people have searched this blog for the string "highlight tone priority," and since inquiring minds want to know, I figured I would write a post about it. Highlight Tone Priority is a setting option on Canon's DSLRs that is often misunderstood. Some people swear by it, and others avoid it like the plague. It can be a useful tool in some circumstances, but just like the choice of "native" vs. "non-native" ISO settings, it is important to understand what it does, how it works, and just what the trade-offs are before deciding whether or not to do use it.
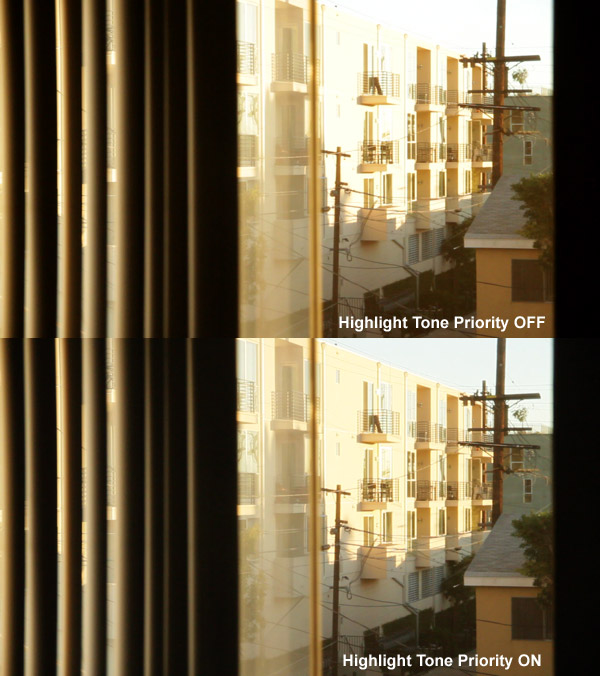
The purpose of Highlight Tone Priority is to increase the effective dynamic range of the camera, specifically by giving you extra protection in the highlights, while keeping the overall exposure the same. In other words, if two identical pictures are taken at the same exposure, one with HTP on and one with it off, the picture taken with HTP on will have fewer blown out highlights. Below is an example.
Both of the above images were shot at ISO 1600, at f2.8, with a shutter speed of 1/50th, and with the same amount of ND. The top one was shot with HTP off and the bottom one was shot with HTP on. The difference is immediately apparent. While the darker areas of the image remain very similar (the vertical blinds, the house and tree at the bottom right of the frame, etc), the bottom image clearly has much more highlight detail. Whereas in the top image the whole sky and much of the building are clearly blown out, in the bottom image the building and sky both retain significant detail.
Sounds great, right? After all, blown out highlights is one of those ugly qualities that screams out "video", and its far superior dynamic range is one of the last things keeping film alive at all. So, why wouldn't anyone want to use such a feature? Well, to answer that question you need to know how Highlight Tone Priority works, and as you might have guessed, there's no such thing as a free lunch.
Shooting Hollerado’s “Americanarama” Video
When your whole job is to make things look good, it can be hard to break certain habits. As a DP, I'm almost always asked to make a project look better than its budget; to achieve the maximum production value from the minimum resources. But every project is different and every project demands its own unique treatment. Once in a while a project comes along that requires me to put aside that entire way of thinking.
This music video for the song "Americanarama" by Canadian band Hollerado was something I shot over the summer that was released on YouTube last week:
Within a day of being posted online, it almost instantly became the most-watched (and most talked about) thing I have ever shot. And yet, from a cinematography standpoint, it's also one of the simplest things I've ever shot.
A Note About Our Sponsor
You may notice the ads strewn about the site for B&H Photo. I just wanted to take a moment to thank them for their support and recommend them to anyone who might be buying any kind of photo, video, lighting, or computer gear at all.
Before I moved to New York, and before the age of online shopping, I knew of B&H from the ads I had seen in the back of photo magazines. Based on their ads, I knew the place must be huge, but I imagined it as some kind of faceless warehouse in an industrial office park somewhere. The first time I went there in person, I was blown away. It was even bigger than I imagined, and it was like a camera wonderland. They had every piece of photo gear imaginable, right there in the store. The bizarre system of product elevators and conveyor belts that run along the ceiling and transport your purchases from the sales counters to the checkout area made the place seem like the store that Willy Wonka would have run if his passion had been photography instead of candy.
The sales people are knowledgeable and helpful, the customer service is excellent, the selection is unbeatable, and the so are the prices. They carry every piece of consumer and professional photo and video gear you could ever want, both on their website, and usually in stock in the store as well, and they have the best prices around. If I ever see an ad online for a price on camera gear that sounds too good to be true, just to make sure, I check out the B&H website to see how much that item really costs. If the advertised price is notably less than the B&H price, I know it's some kind of scam or bait-and-switch tactic, and a cursory look at some of that advertisers' online reviews confirms that this is the case.
If you are in the market for any kind of camera or electronics gear, consider clicking one of the B&H ads to the side or bottom of this page to find it. You can be confident that you're buying from a trustworthy source, and if you enjoy reading these blog posts, you'll be helping to support this site as well.
The Frugal DP: PROAIM Lens Gear Rings
In my last post, I reviewed the amazingly inexpensive DFocus follow focus. When I first heard about the DFocus, my excitement about the price was somewhat tempered by the daunting prospect of outfitting all my lenses with expensive gear rings. After all, what good is a follow focus if the lenses you are pulling focus on are not geared to use one? I looked into many available lens gear options -- the $165 Chrosziel Flexi Gear ring, the $65 Zacuto ZipGear, the $45 Redrock microLensGear (which I believe is actually a reduction in price from the time I was looking at them) -- but on cost alone, none of them lived up to the standards of a truly frugal DP. The least expensive gears I could find were those sold by Jag35 and made by the maker of the DFocus itself, the $30, one size fits all DGear. These prices may not seem all that outrageous if you have one zoom lens that needs a gear ring, but if you have a whole bunch of prime lenses (the subject of a future post, I'm sure) and a couple zooms to outfit, you can see how the cost could escalate quite quickly to potentially many times that of the follow focus, or in some cases, even the lenses themselves. Just as the frugal DP doesn't believe in paying more for a follow focus than on the camera it is to be used with, he also doesn't believe in paying more for gear rings than a follow focus. Or, to put it another way, let me quote The Frugal DP's First Rule of Frugality: "A Good Camera Package is a Proportionate Camera Package." Actually I made that up just now, but it sounds good, and I'm sure I will be coming back to it again and again.

The gear rings are available in six sizes to fit lenses with diameters of 55-65mm, 65-75mm, 75-85mm, 85-95mm, 90-100mm, and 100-110mm
I was just about resigned to the fact that I was going to have to spend several hundred dollars on gear rings for my ten or so lenses, when I came across a post on the Cinema5D forum mentioning cheap lens gears. They turned out to be the lens gears included with the "PROAIM" follow focuses from India that you've no doubt seen for sale on eBay. They are also sold through the website thecinecity.com. I wasn't interested in the follow focus, but it turns out you can order just the gear rings, if you are so inclined, for a mere $12 each. You will probably not see just a set of the gear rings for sale on eBay, nor on The CineCity website, but if you contact the seller of the follow focus on eBay, or email The CineCity at sales@thecinecity.com, they will sell them to you.
The Frugal DP: DFocus Review
Today I am starting a feature on this blog called The Frugal DP, in which I will be doing gear reviews specifically aimed at the filmmaker who is trying to obtain great production value on a shoestring budget. I won't necessarily be looking for the best gear available, but the gear that provides the most bang for the buck.
My first review is of my most recent acquisition -- the DFocus V2 Follow Focus, which is now distributed by Jag35.com.
An affordable follow focus has been a dream of mine for a long time. At one point I thought of trying to build one myself for my old Krasnogorsk K-3 windup Russian 16mm camera, but I never had access to the right tools or the mechanical engineering know-how to do it. Frankly, it would have been wasted on that camera anyway, but it would have looked cool. Now that there are finally some affordable follow focus-worthy cameras out there, equipment manufacturers have responded to the demand for them, and there are lots of follow focus options on the market. Most of them, however, remain extremely expensive (maybe not relative to traditional film equipment prices, but at least relative to a camera like the Canon 7D). Zacuto's follow focus units start at $1300. To me it doesn't make any sense to spend almost as much or more on an accessory like a follow focus than on your camera itself.
Canon HD DSLR “Native ISO”
If you've spent any time researching Canon's HD DSLR cameras, you've probably come across discussions of which of the cameras' ISO settings to use and which to avoid. There seems to be a common misconception out there, held by even some very well-regarded experts (http://www.zacuto.com/shootout, webisode 2, about 3 minutes in) that the cameras' "native ISO" or "true ISO" settings are the multiples of 160 (ISO 160, ISO, 320, ISO 640, etc), and that the rest of the ISO settings are produced digitally. This is not true. In fact the cameras' native ISO settings (that is, the settings that are derived from analog gain rather than digital exposure compensation) are the multiples of 100 (ISO 100, ISO 200, ISO 400, ISO 800, etc). However, that doesn't necessarily make them better.
I believe that much of the confusion comes from mis-analyzing tests such as these:
http://marvelsfilm.wordpress.com/2009/10/10/canon-7d-noise-and-iso-test/
http://www.cinema5d.com/viewtopic.php?f=14&t=4736
that clearly show that the 160-multiple ISO settings exhibit less noise than the 100-multiple ISO settings. Viewing these test results is often surprising to people because it goes against the conventional wisdom that the higher the ISO, the noisier the image will be, and the lower the ISO, the cleaner it will be. In fact, it is very surprising to learn that ISO 1250 can look on par with or even better than ISO 125. The natural assumption when looking at these tests is that the native ISOs must be the cleanest ones. This seems like a logical assumption at first, but it doesn't hold up when you look at it a little bit closer.
Sensor Size and Depth of Field
In my last post, I discussed the relative frame sizes of 35mm still film and 35mm motion picture film, and how this relates to the depth of field of the two formats. I mentioned that imager size and depth of field have an inversely proportional relationship. I find that a lot of people know that this is true, but are confused as to why this is. I was confused by it myself for a long time, and I have never seen it explained in a very clear way, so I am going to try to explain it. If I end up just confusing you further, well that's the chance you take by reading this blog.
If you've ever taken a photography class, or read a book about photography, you no doubt learned the three variables that affect depth of field: focal length, distance to subject, and aperture. Ok, so what about format (sensor size)? How does that come into play? Well, chances are you don't remember hearing about that one, because it's not really a variable. If you are shooting on 35mm film, you're only concerned with the depth of field of 35mm film. When you're taking a picture, chances are you're not going to grab a camera that shoots in another format just because you want more or less depth of field, the way you might change the aperture or choose a different lens for that reason.
